

Creating a subdomain in DigitalOcean is simple and straightforward. This guide will walk you through the steps needed to set it up.
A subdomain helps you organize your website better. It can also enhance your site’s navigation and user experience. DigitalOcean provides an easy way to manage and create subdomains. This is useful for running separate sections of your website, such as blogs, stores, or support pages.
In this post, we will show you how to create a subdomain in DigitalOcean. By following these steps, you can ensure your website is well-structured and user-friendly. Let’s get started and make your website more organized!
Credit: docs.digitalocean.com
Introduction To Subdomains
Creating a subdomain on DigitalOcean can be an important task. It can help organize your website better. But first, let’s understand what a subdomain is and its benefits.
What Is A Subdomain?
A subdomain is a part of your main domain. It acts as an extension. For example, in blog.example.com, “blog” is the subdomain of “example.com”.
Subdomains are used to manage different sections of a website. They help in keeping content organized. This makes navigation easier for users.
Benefits Of Using Subdomains
Subdomains offer several advantages:
- Improved Organization: They help categorize content. For instance, store.example.com for a shop and support.example.com for help.
- Better SEO: Search engines treat subdomains as separate sites. This can improve your website’s search engine ranking.
- Enhanced User Experience: Users can find what they need faster. Different subdomains for different functions make navigation simple.
- Separate Analytics: Track performance of each subdomain individually. This helps in understanding user behavior better.
Using subdomains can make your website more efficient. It can also help in providing a better experience for your visitors.
“`
Credit: docs.digitalocean.com
Setting Up Digitalocean Account
Creating a subdomain in DigitalOcean starts with setting up your account. This guide will walk you through the steps to create a DigitalOcean account and navigate the dashboard. By the end, you’ll be ready to set up your subdomain with ease.
Creating A Digitalocean Account
To begin, visit the DigitalOcean website. Click on the “Sign Up” button. You have two options: sign up with an email or use a social account.
For email signup, enter your email address and create a strong password. Click “Create Account”. You will receive a verification email. Open it and click on the verification link.
If you choose a social account, click on the corresponding button (Google, GitHub, etc.). Follow the prompts to authorize DigitalOcean to access your account.
Once verified, you will be redirected to the DigitalOcean dashboard. Here, you can start exploring and setting up your projects.
Navigating The Dashboard
The DigitalOcean dashboard is user-friendly and intuitive. On the left sidebar, you will find various options:
- Droplets: These are virtual machines.
- Volumes: Extra storage for your droplets.
- Domains: Manage your domain names and DNS records.
- Projects: Organize your resources into projects.
To create a new project, click on “Projects” in the sidebar. Then, click the “New Project” button. Name your project and provide a short description. Click “Create Project”.
Within your project, you can add resources like droplets or volumes. Click on the “Resources” tab to manage them.
To manage domains, click on “Domains” in the sidebar. Here, you can add a new domain or subdomain. Click on the “Add Domain” button and follow the instructions.
By navigating these options, you can easily manage your DigitalOcean account and resources.
Domain Management In Digitalocean
Managing domains in DigitalOcean is straightforward and efficient. Setting up a subdomain involves a few key steps. Knowing how to do this can improve your web presence. Let’s walk through the process.
Adding A Domain To Digitalocean
First, you need to add your domain to DigitalOcean. Log in to your DigitalOcean account. Navigate to the “Networking” tab. Click on “Domains.” Here, you will find an option to add a new domain.
Enter your domain name in the provided field. Click the “Add Domain” button. Your domain is now added to DigitalOcean. This is the first step towards setting up a subdomain.
Accessing The Networking Section
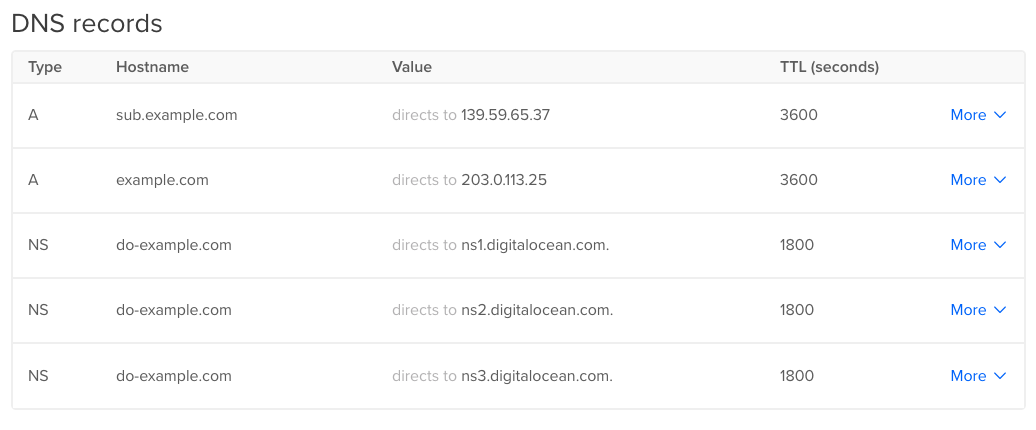
Next, access the “Networking” section in your DigitalOcean account. This is where you manage your domains and subdomains. Navigate to the “Domains” subsection. Here, you will see a list of your added domains.
Select the domain you want to create a subdomain for. Look for the option to add an “A Record.” This will allow you to point your subdomain to the correct IP address. Enter the subdomain name and the IP address of your server. Save your changes.
These steps will create a subdomain in DigitalOcean. Managing domains and subdomains is simple with DigitalOcean. Follow these steps to enhance your web presence.
Creating A Subdomain
Creating a subdomain on DigitalOcean is a straightforward process. A subdomain helps in organizing different sections of your website. For example, you can create a blog for your site and name it blog.yoursite.com. This guide will walk you through creating a subdomain on DigitalOcean.
Accessing Dns Settings
First, log in to your DigitalOcean account. From the dashboard, navigate to the Networking section. Click on Domains. Here, you will see a list of your domains. Select the domain where you want to add a subdomain. This will take you to the DNS settings page. Check that you have the right domain selected.
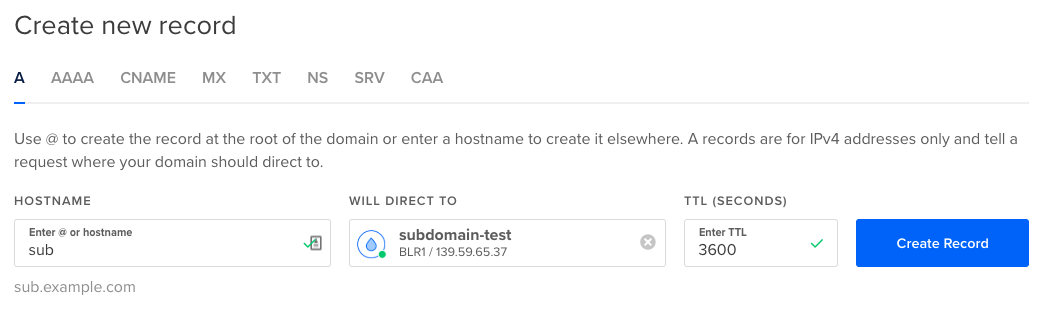
Adding A New A Record
Now, scroll down to the DNS Records section. You need to add a new A record. Click on the Add Record button. In the Type dropdown, select A. In the Name field, enter your subdomain name, like blog. In the IP address field, enter the IP of your server. Click on Create Record. Your subdomain is now created.
Configuring Dns Records
Configuring DNS records is crucial for creating a subdomain on DigitalOcean. Proper DNS settings ensure your subdomain points to the right server. This process involves setting up various DNS records, which guide internet traffic to your subdomain.
Types Of Dns Records
Several types of DNS records exist. Each serves a unique purpose. The most common ones include A, CNAME, and MX records. A records map domain names to IP addresses. CNAME records create aliases for domain names. MX records direct email traffic to mail servers. Understanding these records helps you configure them correctly.
Setting Up A Records For Subdomains
To set up A records, access your DigitalOcean dashboard. Go to the networking section and select your domain. Click on “Add Record” and choose “A” as the record type. Enter your subdomain name in the hostname field. Provide the IP address of your server in the value field. Save the record to complete the setup. Now, your subdomain will point to the specified IP address.

Credit: www.youtube.com
Testing The Subdomain
Testing the subdomain is crucial after you set it up on DigitalOcean. This ensures it’s working correctly and is accessible. You need to verify DNS propagation and troubleshoot any common issues. Below, you will find a step-by-step guide on these tasks.
Verifying Dns Propagation
First, you must verify DNS propagation. This process may take some time. Use tools like DNS Checker to see if your subdomain has propagated globally. Enter your subdomain URL in DNS Checker. Select the record type, usually “A” or “CNAME”. Click “Search”. You will see a list of locations and their DNS status. If most locations show your subdomain, DNS propagation is complete.
Troubleshooting Common Issues
Sometimes, your subdomain might not work as expected. Here are some common issues and solutions. Check if your DNS settings are correct. Ensure the subdomain points to the right server. Verify there are no typos in the DNS records. Confirm that your server is running and accepting requests. Clear your browser cache or use a different browser. This can help load the latest DNS settings.
If the issue persists, contact DigitalOcean support. They can provide further assistance. Remember, patience is key. DNS changes can take up to 48 hours to propagate fully.
Using Subdomains Effectively
Subdomains can help manage and organize various sections of your website. They can enhance the user experience by providing a clearer structure. This can be especially useful for large websites with multiple functions or services. Let’s explore how to use subdomains effectively.
Organizing Content
Subdomains can group related content together. For example, you could use a subdomain like blog.yourwebsite.com for all blog posts. This makes it easier for visitors to find what they need. It also keeps your main domain uncluttered.
Separate subdomains for different regions or languages can cater to a global audience. This ensures that each user gets relevant content. It also simplifies navigation and improves user satisfaction.
Improving Seo
Search engines treat subdomains as separate entities. This can be beneficial for targeting specific keywords. By focusing on niche topics, you can improve your search engine rankings. It also allows you to create more specific content.
Subdomains can also help with link building. You can generate backlinks to your subdomains, boosting overall domain authority. This can lead to higher visibility and better search results.
Advanced Subdomain Configurations
Creating subdomains on DigitalOcean is straightforward. But, exploring advanced configurations can unlock more capabilities. Here, we dive into advanced subdomain configurations. Learn how to set up redirections and integrate with third-party services.
Setting Up Subdomain Redirection
Subdomain redirection ensures users get to the right destination. This is especially useful if you’ve changed your site structure.
To set up subdomain redirection on DigitalOcean:
- Log in to your DigitalOcean account.
- Go to the DNS settings of your domain.
- Add a new CNAME record for the subdomain.
- Point it to the new destination URL.
Here’s a table showing a sample CNAME record:
| Type | Name | Value | TTL |
|---|---|---|---|
| CNAME | blog | newblog.example.com | 3600 |
Wait for DNS propagation. This can take up to 24 hours.
Integrating With Third-party Services
Integrate subdomains with third-party services for added functionality. Services like Google Analytics, Mailchimp, or AWS can be beneficial.
To integrate with Google Analytics:
- Sign in to your Google Analytics account.
- Navigate to the Admin section.
- In the Property column, click on “Tracking Info”.
- Select “Tracking Code” and copy the code snippet.
- Paste this code in the header of your subdomain’s HTML file.
For Mailchimp integration:
- Log in to your Mailchimp account.
- Go to the Account settings.
- Find the “Domains” section and add your subdomain.
- Verify the subdomain by following the on-screen instructions.
For AWS integration:
- Log in to your AWS account.
- Go to the Route 53 service.
- Create a new hosted zone for your subdomain.
- Add the necessary DNS records provided by AWS.
These integrations enhance your subdomain capabilities. They provide better analytics, marketing, and infrastructure options.
Frequently Asked Questions
What Is A Subdomain?
A subdomain is a secondary domain. It’s part of your main domain. It helps organize and navigate different sections of your website.
Why Use Subdomains On Digitalocean?
Subdomains help manage different site sections. They improve organization and navigation. DigitalOcean offers easy subdomain setup and management.
How To Create Subdomain In Digitalocean?
Log in to DigitalOcean. Go to the domain settings. Add a new subdomain. Point it to your desired IP address.
Can I Create Multiple Subdomains?
Yes, you can create multiple subdomains. Use them to organize different parts of your site. Each subdomain can have unique content.
Conclusion
Creating a subdomain on DigitalOcean is simple and efficient. Start with a clear plan. Follow the steps mentioned in this guide. Your subdomain will be ready in no time. Remember to check your DNS settings carefully. Small mistakes can cause issues.
Keep practicing, and you’ll get better. Subdomains are useful for organizing different parts of your website. They make management easier. Enjoy the flexibility DigitalOcean offers. Happy hosting!